
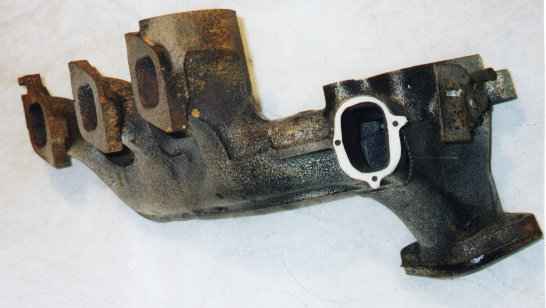
Inspect the "core" stock manifold for cracks, warping and broken bolts. If there are any cracks in the rear area of the manifold, it will be best to find another unit to use as a core.
 Start
by sawing off the front "leg" of the stock manifold. Make the saw cut
just in front of the "cross rib" that runs between the two branches
of three ports leading out of the heat riser area. Another "landmark"
for your cut is the casting "clock" mark, located on the curve of the
front section, leading away from the heat riser area. Make your cut
just in front of this mark. Use a sharp hack saw to make the cut and
make it as straight as possible.
Start
by sawing off the front "leg" of the stock manifold. Make the saw cut
just in front of the "cross rib" that runs between the two branches
of three ports leading out of the heat riser area. Another "landmark"
for your cut is the casting "clock" mark, located on the curve of the
front section, leading away from the heat riser area. Make your cut
just in front of this mark. Use a sharp hack saw to make the cut and
make it as straight as possible.
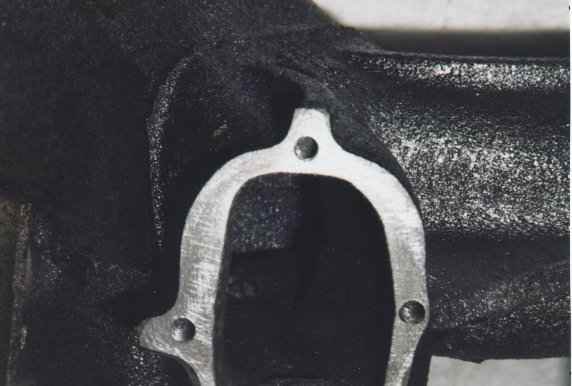 File
the "face" of the cut flat and fit a piece of 3/16" (.187) steel or
iron plate so it covers the opening. If you plan to weld this plate
on, you must grind all the surrounding areas down to clean metal and
it is nice to angle the outside edge ("V") to provide a place for
weld penetration. If you plan to screw down the plate you will want
to make the plate approximately 1/4" larger than the mating surface
in order to allow room for the screw heads.
File
the "face" of the cut flat and fit a piece of 3/16" (.187) steel or
iron plate so it covers the opening. If you plan to weld this plate
on, you must grind all the surrounding areas down to clean metal and
it is nice to angle the outside edge ("V") to provide a place for
weld penetration. If you plan to screw down the plate you will want
to make the plate approximately 1/4" larger than the mating surface
in order to allow room for the screw heads.
Drill and tap 2 to 4, 8-32 UNC screw holes, locating them on the ends of the reinforcing ribs where the metal is the thickest. Use two screw holes if you are welding on the plate, use 4 if you plan to screw down the plate using a gasket and high temperature sealer.
Here is a tricky part. You must locate matching through-holes in the plate. I simply apply some wet paint to the surface around the tapped holes and carefully press the plate down in the proper position. This leaves a "road map" impression on the plate showing where to drill. You can drill these holes @1/4" to allow some clearance. Note that aligning a 4-hole set is more difficult than a 2 or 3 hole set so it is a good idea to recheck the locations with another "impression" after the second through hole is drilled.
Use of flathead type machine screws is advised and you will need to countersink the through holes so the head of each screw is flush with the plate. Perform a trial fit using the paint impression trick to help find any high spots. (Important if you will not be welding.)
Use high temperature silicon sealer and gasket material if using the screw-down approach. Clean approximately 1/2 inch of inside wall and be generous with the sealer so a "plug" of sealer forms behind the plate. Put sealer on the screw threads and cover the heads once the screws are tightened to help reduce the chance of back-out.
 When
welding cast iron, the surface to be welded must be completely clean.
Get everything assembled and ready to weld. It is a good idea to
disassemble or protect the heat riser valve spring, (wrap foil around
it) then preheat the assembly as much as you can. Wrap the heated
unit in a thermal blanket ( or fiberglass insulation) leaving the
area to be welded exposed. Arc or gas weld using cast iron or nickel
welding rod. Gas brazing will also work for most applications where
the plate has been screwed down. When the welding is finished, cover
the area with insulation and let the unit cool slowly
(overnight).
When
welding cast iron, the surface to be welded must be completely clean.
Get everything assembled and ready to weld. It is a good idea to
disassemble or protect the heat riser valve spring, (wrap foil around
it) then preheat the assembly as much as you can. Wrap the heated
unit in a thermal blanket ( or fiberglass insulation) leaving the
area to be welded exposed. Arc or gas weld using cast iron or nickel
welding rod. Gas brazing will also work for most applications where
the plate has been screwed down. When the welding is finished, cover
the area with insulation and let the unit cool slowly
(overnight).
 Grind
the weld and clean the manifold, bead blast and paint if
desired....now you're ready to install the set.
Grind
the weld and clean the manifold, bead blast and paint if
desired....now you're ready to install the set.
 NEW!
Revised casting for front and rear mounting.
NEW!
Revised casting for front and rear mounting.