Slant Six Forum
https://www.slantsix.org/forum/

Covalt - "Project 65 Valiant"
https://www.slantsix.org/forum/viewtopic.php?t=35632
Page 125 of 127

Author:  slantzilla [ Fri Oct 31, 2025 8:50 am ]
Post subject:  Re: Covalt - "Project 65 Valiant"

Thanks for the update Rick. On the fuel pump, sometimes we get lost on the need for the latest, greatest pieces just because we believe we need them and they look cool.

Years ago a buddy raced a 427/4 speed Fairlane and was running low 12s with a stock fuel pump and lines. Everybody told him his pump was holding the car back and he needed an electric pump and all the goodies that went with it. He spent almost $200 for the pump, all new bigger lines, and regulator. Guess how much the car picked up?


0 :mrgreen:

Author:  Rick Covalt [ Fri Oct 31, 2025 9:05 am ]
Post subject:  Re: Covalt - "Project 65 Valiant"

Quote:
Guess how much the car picked up?
I bet he ran 10's! :mrgreen:

Author:  slantzilla [ Fri Oct 31, 2025 10:30 am ]
Post subject:  Re: Covalt - "Project 65 Valiant"

:lol:

Author:  Greg Ondayko [ Fri Oct 31, 2025 2:05 pm ]
Post subject:  Re: Covalt - "Project 65 Valiant"

I ran a stock Slant 6 pump on Ruster for many years with a 750 Carb it went 12's.

:D

Author:  Rick Covalt [ Fri Oct 31, 2025 2:09 pm ]
Post subject:  Re: Covalt - "Project 65 Valiant"

Yep! The webers want high volume and low pressure, @ 3.5# or so, thus my concern that the stock pump may have too much pressure and then drop off at high rpm. Doesn't appear to be an issue. :D

Author:  Greg Ondayko [ Fri Oct 31, 2025 3:52 pm ]
Post subject:  Re: Covalt - "Project 65 Valiant"

Oops. Forgot about webers..

Yes you wants something non stock.
Greg

Author:  Rick Covalt [ Fri Jan 23, 2026 7:58 am ]
Post subject:  Re: Covalt - "Project 65 Valiant"

Most all of the parts are now on hand or are on the truck shipping from Dr.Diff to perform my 4 speed swap! :D I was going to start next week, but with this tiny little snow they are calling for I will probably wait till that mess is cleaned up.

New "modified" Quick time bellhousing- check
Lightweight steel racing flywheel, resurfaced-check
New Mcleod 10 1/2" clucth and PP. - check
Mcleod Hydraulic clutch assembly - check
Measurement from Lou on hydraulic clutch rod mount-check ( Wonder where I put that?)
Rebuilt 833 OD with new shift fork & linkage-check
Offset master cylinder adapter-check
Two cans of color matched paint for the inner fenders-check
New front and rear carpet-check
New shifter boot-check
New Rod & main bearings-check (These are just in case I want to pull the pan while engine is out, which I likely won't)
New complete fuse box & wiring-check ( If I am feeling energetic, which I'm not)

I don't think I am missing anything all that big. So after the Blizzard here I come! :D :D

Author:  Charrlie_S [ Sat Jan 24, 2026 7:42 am ]
Post subject:  Re: Covalt - "Project 65 Valiant"

Go, Rick, Go

Author:  Rick Covalt [ Wed Feb 11, 2026 12:00 pm ]
Post subject:  Re: Covalt - "Project 65 Valiant"

Finally got out of the single digits for more than 10 minutes here in PA, so I was ready to start my 4 speed install. But before I started I had something I had wanted to do for a long time. I always wanted a nice metal top on my workbench. So our local metal guy bent me a top to fit my existing table. Man do I love it! 1/8" thick and it was just a bit over $120. Here is a picture.
Attachment:
IMG_1123.jpg
IMG_1123.jpg [ 28.8 KiB | Viewed 2415 times ]
I also have a Quicktime blow proof which had a large hole for where the clutch fork would be. But I am running a McLeod setup so all I have is 2 hydraulic lines. I bent a piece of 1/4" plate to the proper bend and welded a flange on it to fit into the hole. Then I will bolt it into place. That will eliminate about a 3"X4" hole out the side in case of explosion.
Attachment:
IMG_1130.jpg
IMG_1130.jpg [ 18.77 KiB | Viewed 2415 times ]
Attachment:
IMG_1128.jpg
IMG_1128.jpg [ 16.67 KiB | Viewed 2415 times ]
Everything has been disassembled to the point that the engine and transmission are ready to lift out. Probably tomorrow morning will be the time.. More to follow! :D

After talking to my friend who built the bottom end for me, I have decided to cut the oil filter apart and look at the evidence. If it looks good then I am not going to pull the pan off at all. Since I have not had any problems and no drop in performance he said he wouldn't touch it unless the filter says differently. Made sense to me! :D

Author:  Rick Covalt [ Thu Feb 12, 2026 2:19 pm ]
Post subject:  Re: Covalt - "Project 65 Valiant"

Engine and transmission is out and separated from each other. Removed the automatic shifter and cable from the car.
Removed everything from the inner fenders and unbolted the master cylinder. Test fit the new offset master cylinder bracket- All looks good. I mounted the blow proof and checked the run out and it is dead on left to right and out about .004 up and down. I can't remember the tolerance but I think that is close enough. I have to get an input bushing in the morning since my crank has none. I am doubtful the blowproof will fit my early A body without some massaging on the tunnel. Mainly because of the way the top two bolts go in. I will likely cut a window in the floor board to access those two from the inside. Pictures to come tomorrow.

Author:  Rick Covalt [ Sat Feb 14, 2026 11:40 am ]
Post subject:  Re: Covalt - "Project 65 Valiant"

Mounted the block plate and flywheel with lock ring. Installed new pilot bushing. Test fit the starter since this blowproof had the starter mount moved out @ .400" so I can run the V-8 flywheel and clutch. Engagement looked great. Mounted the clutch , Pressure plate and then installed the blowproof. Now I will stick this in without the trans so I can see how much I need to massage he floor pan / firewall area. If it is too much I will just cut out a large window and make a new plate for over it. Not like this is a show car! :D :D
Attachment:
clutch.jpeg
clutch.jpeg [ 47.97 KiB | Viewed 1403 times ]
Starter tooth engagement looks super!
Attachment:
starter teeth.jpeg
starter teeth.jpeg [ 23.72 KiB | Viewed 1403 times ]
Plenty of header clearance to the bellhousing.
Attachment:
header clearance.jpeg
header clearance.jpeg [ 41.31 KiB | Viewed 1403 times ]


Attachments:
blow proof.jpeg
blow proof.jpeg [ 45.64 KiB | Viewed 1403 times ]

Author:  Greg Ondayko [ Sat Feb 14, 2026 3:47 pm ]
Post subject:  Re: Covalt - "Project 65 Valiant"

No clearance issues with your headers?

Greg

Author:  Rick Covalt [ Sat Feb 14, 2026 7:50 pm ]
Post subject:  Re: Covalt - "Project 65 Valiant"

No actually. The bellhousing clears the headers by about 2" and I am running the hydraulic clutch setup, so no Z bar.
Attachment:
header clearance.jpeg
header clearance.jpeg [ 41.31 KiB | Viewed 1445 times ]
One thing I did forget, and I ordered them about 2 hours ago, was a new set of the poly engine mounts from Johnny Spiva with the steel interlocking brackets built into them. Once they arrive I want to get the engine sitting exactly where it is supposed to be and then see how my headers fit. There is a possibility that I will put the hot wrench to them to get them to be a little further from the torsion bar. I have been running a truck style interlock motor mount on the driver side with a spacer. So adjustment may be needed.

I sat the engine down in the car with the bellhousing on and it fits pretty well. It was touching or very close on the top most bell bolt. So I marked that area (The whole way around the top of the bellhousing) and then took the hot wrench and a small dead blow hammer and "massages the area back about an inch. Also heated the pinch weld and rolled it up flat just to be sure. More to come.


Here you can see the bolts at the top and right hand side. They are actually about 2 1/2" long and have a welded tube into the blow proof. This actually makes the bellhousing quite a bit deeper towards the firewall in those areas.
Attachment:
blow proof.jpeg
blow proof.jpeg [ 45.64 KiB | Viewed 1443 times ]

Author:  slantzilla [ Sun Feb 15, 2026 12:21 pm ]
Post subject:  Re: Covalt - "Project 65 Valiant"

Great stuff Rick! :mrgreen:

Author:  Rick Covalt [ Fri Feb 20, 2026 11:37 am ]
Post subject:  Re: Covalt - "Project 65 Valiant"

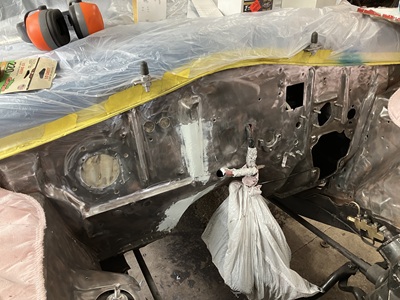
With the engine out I had always wanted to repaint the inner fenders and firewall to match the outside of the car. It is a dirty rotten stinkin job as my dad used to say! :D Plus I know Robbie (painter friend) is extremely particular. And he is going to come over and shoot the engine bay with an epoxy primer sealer, so I wanted it clean. I have wire wheeled and scraped and sanded off and on for the last 3 days.I'm almost finished. Then I can clean everything up , tape it up and give him a call. He is only 3 miles away, and will just come to my house and shoot it. Body filler to the passenger side of center is where some guy had a clutch explosion in 1977! Forgot that was there, but I did redo it and will hopefully cover it up for the last time in my lifetime. :mrgreen:

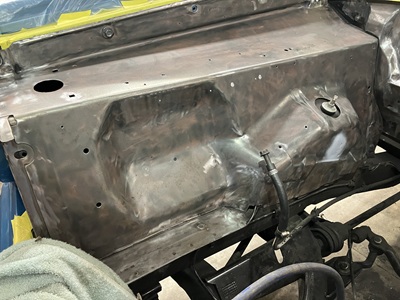
Also sat the engine back in (3rd time) and verified how it will sit on factory mounts. I saw that my K-frame on the passenger side at the oil pan was all but touching. So I pulled the engine back out cut another piece out of the K frame and welded in a plate that was back about another 3/4" for extra clearance.

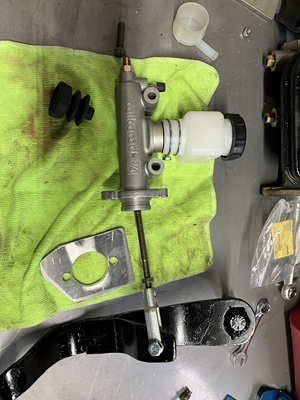
Mounted the clutch master on an aluminum plate I made, that sat in beside where the steering wheel goes through the firewall. After 2 hours of fiddling I realized it was too far down on the pedal and I would only have about 2" of pedal travel. Not going to like that. Started over and ended up mounting the master through old speedometer hole. Looked just about right! I made a Z-shaped bracket and welded it to the original clutch pedal so it lined up on the center of the master. Mounted everything including the offset Brake master cylinder and everything looks good. Probably 4 1/2" of pedal travel now. After carpet padding is in I will bolt in a pedal stop so as not to bottom out the master cylinder. I made a small stiffener plate for inside the car behind the master, but I will fabricate a nice bracket to go from the inner fender back to the master cylinder.That will take out all flex in the firewall. More to come.
Attachment:
clutch master.png
clutch master.png [ 235.62 KiB | Viewed 1655 times ]
Attachment:
IMG_1162.png
IMG_1162.png [ 208.88 KiB | Viewed 1655 times ]
Attachment:
IMG_1169.JPG
IMG_1169.JPG [ 64.19 KiB | Viewed 1655 times ]
Attachment:
IMG_1174.JPG
IMG_1174.JPG [ 70.48 KiB | Viewed 1655 times ]

Page 125 of 127 All times are UTC-07:00
Powered by phpBB® Forum Software © phpBB Limited
https://www.phpbb.com/