Body work is lots of work! keep on going. It a test of will power and determinaition. Don't stop, keep going. You can do it!!!!!.
Joe
| Slant Six Forum https://www.slantsix.org/forum/ |
|
| My brother's "new" 74 Duster https://www.slantsix.org/forum/viewtopic.php?t=33926 |
Page 4 of 12 |
| Author: | oklahoma joe [ Mon Oct 12, 2009 3:40 pm ] |
| Post subject: | |
Body work is lots of work! keep on going. It a test of will power and determinaition. Don't stop, keep going. You can do it!!!!!. Joe |
|
| Author: | Reed [ Mon Oct 12, 2009 3:42 pm ] |
| Post subject: | |
Thanks for the encouragement. I know it will take a bunch of effort to get the rear end on this car looking remotely close to straight again, but I think I can get there. It will look pretty cool when it is all done though. |
|
| Author: | Reed [ Sat Apr 30, 2011 2:10 pm ] |
| Post subject: | |
After a 2 year hiatus, I started doing the bodywork on my brother's Duster again. I broke out the palm sander and spent about half an hour sanding down the filler I put on the dent two years ago. I figure about another two hours worth of work and I will have the rear dents and welding damage all smoothed over. Then on to fixing the inside of the trunk. I have to weld in the Demon taillight brackets I got from a Demon that was being junked, and I also have to fix the passenger side taillight so it won't leak. The replacement body panel got welded in place at a slightly flexed position which makes the taillight housing not seal against the body. I figure some All-Metal body filler will fix the problem. Slap a bunch around the taillight opening, cover the taillight housing with a bunch of saran wrap, then press the taillight housing into the body filler while the filler is still wet. Let the filler set up and then I will have a contour that will seal against the taillight housing. Before sanding I hit the areas with a coat of primer and a coat of blue paint just so I could see the high and low spots better. 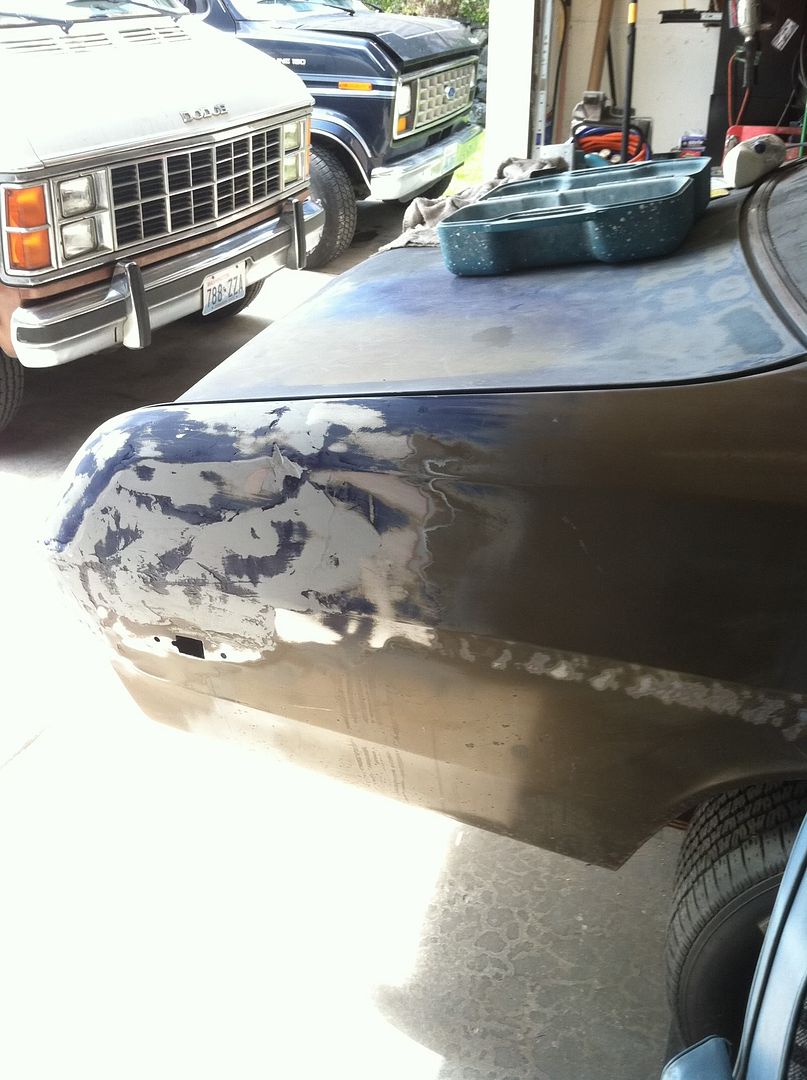  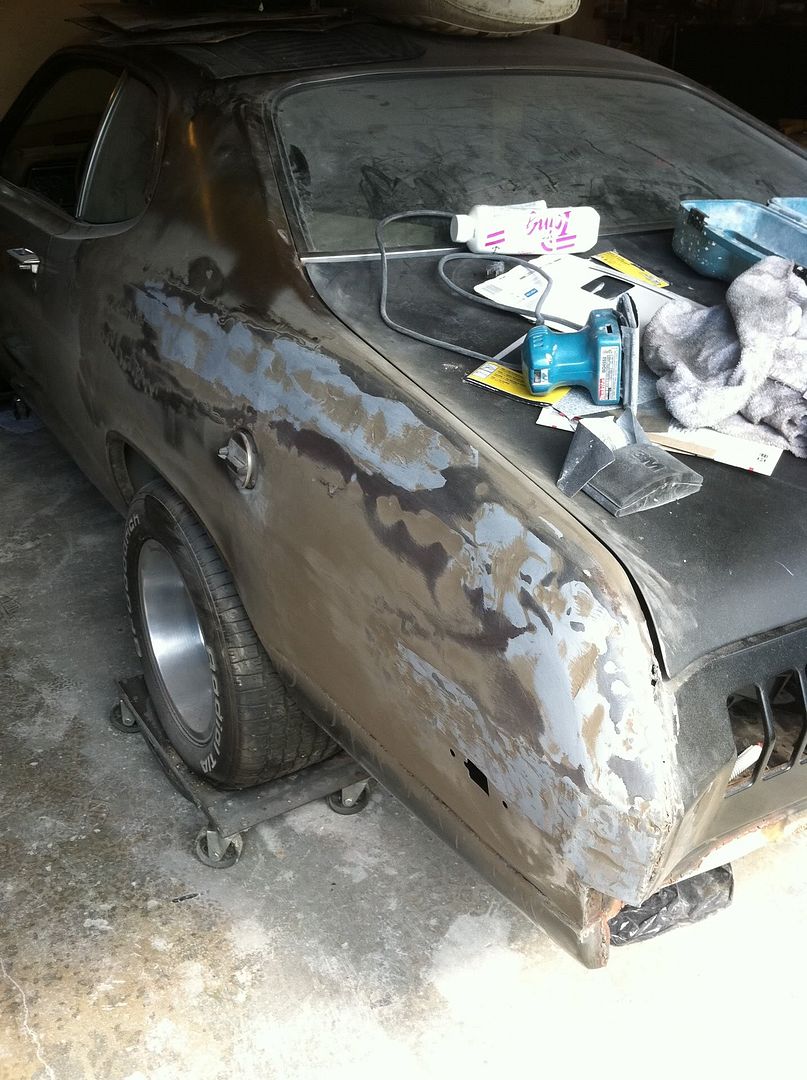 It's rough but looks better than it did when I hauled it home two years ago: 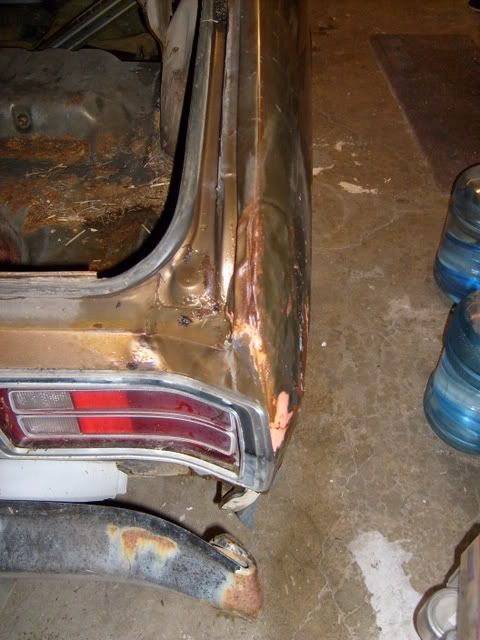 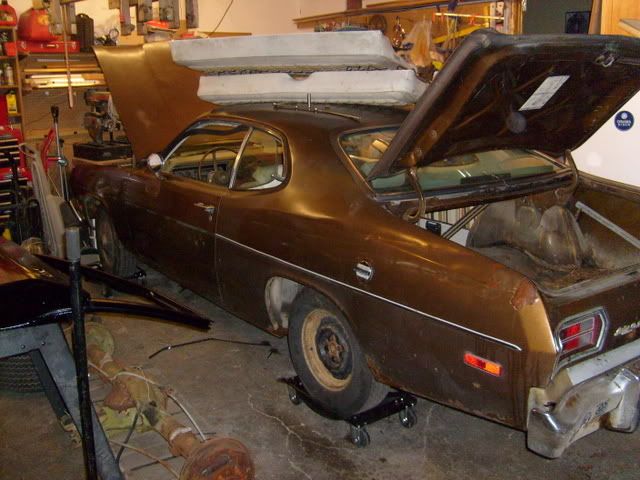 The front end will be from a 67 Dart GT but I need to do some rust and dent repair on both front fenders. The rear bumper is off of a 72 Dart Swinger and has the reverse lights in the bumper. The front bumper will be the 67 Dart bumper. We also will be installing 68 Dart fender-top turn signals and 68 Dart running lights. The running lights will be wired into the turn signals so they will flash with the turn signals My goal is to get this car at least in a single coat of crappy black paint and on the road by the end of the year. For now we are keeping the original 74 motor. It has less that 100,000 miles on it and ran great back in 2009. I will pull it to detail and paint the engine compartment and while it is out I will replace all the gaskets and the timing set. The transmission will be being rebuilt by Fopar as soon as I can figure out a way to get it down to him. The rear axle will be getting a set of 3.2 rear gears out of a Dodge van. The super fat rims will be coming off and will be replaced by a set of 15x6 factory aluminum rims from the late 70s: 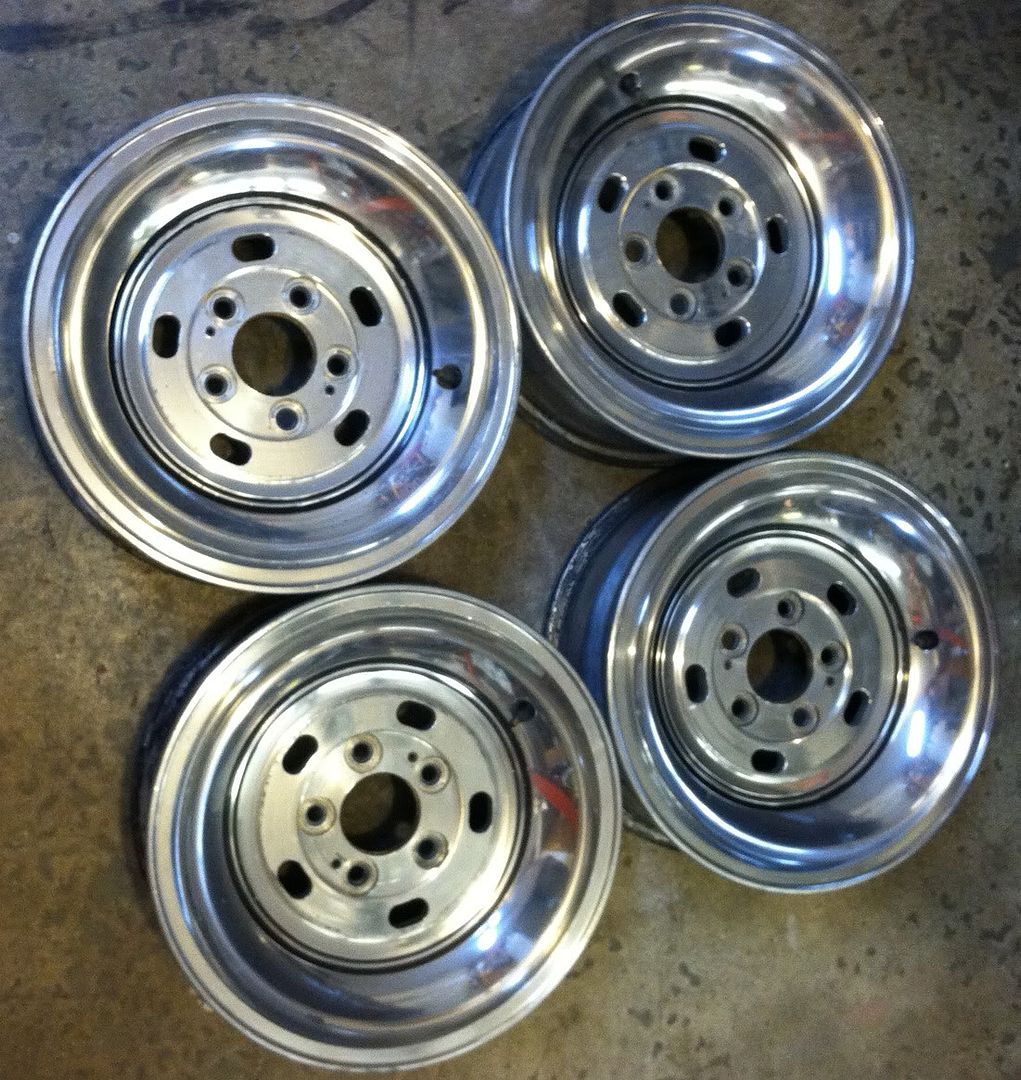 These rims will be temporary until we can save up enough money to get a set of the American Racing reproduction slotted mag wheels that have the correct 4 inch backspacing. The interior will have bucket seats out of a 96 Sebring convertible and will be changed in color to black. Not sure what custom stuff will be happening in the interior, but the A/C will be kept and upgraded to R-134 and the later style compressor. Ultimately this car will be the test bed for the Ford MAF based sequential fuel injection system I am putting together. I have an 83 hydraulic slant motor that will be rebuilt and assembled on a test stand for purposes of working the bugs out of the fuel injection system. Once I know it works, the hydraulic motor will go into the Duster and the 74 motor will be pulled on put on the engine test stand. Lots of work between now and then, but I hope to get most of it done this year. Anybody want to buy some HUGE slotted mags? |
|
| Author: | Reed [ Wed Dec 28, 2011 11:38 am ] |
| Post subject: | Glamour shots! |
Finally getting some work done on my brother's Duster project. Got a transmission rebuilt and installed, and I will be getting a driveshaft shortened to install in the next few days. Fingers crossed, but the Duster may be able to drive and stop under its own power again by the end of the week. In the meantime, I had to push the Duster out of my garage for the first time in over two years in order to make room for my brother's PT Cruiser. The Cruiser has a failing water pump and we are going to replace it (as well as everything else on the way in to the water pump). I took the opportunity to take some pictures of the 74 Duster body as it sits now. 74 Duster shell, Demon tail panel, 70 Duster smooth trunk lid, 67 Dart hood, front fenders, and bumper, 97 Sebring seats. I think it will look pretty sharp when it gets done: 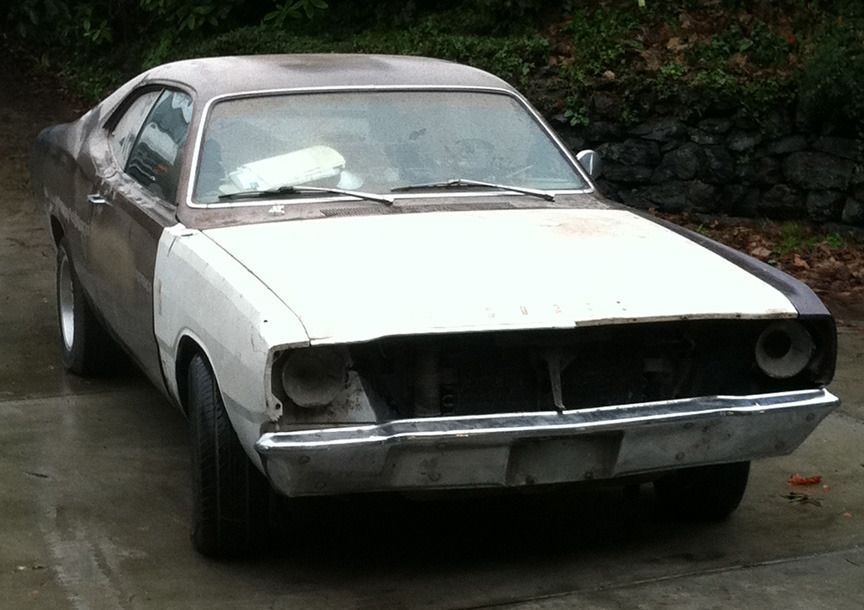 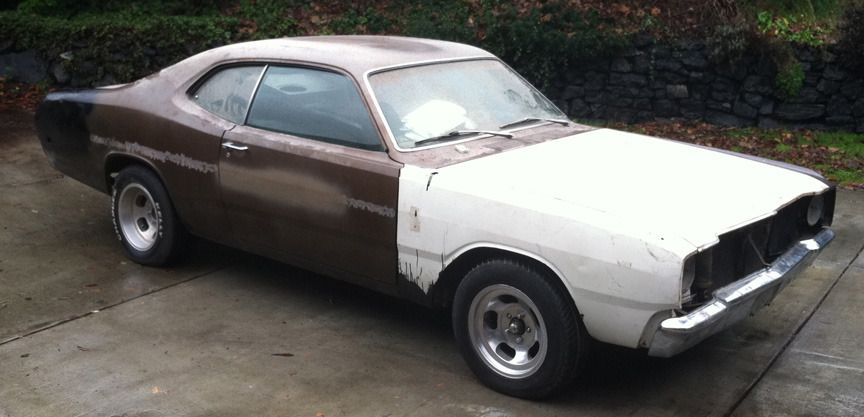 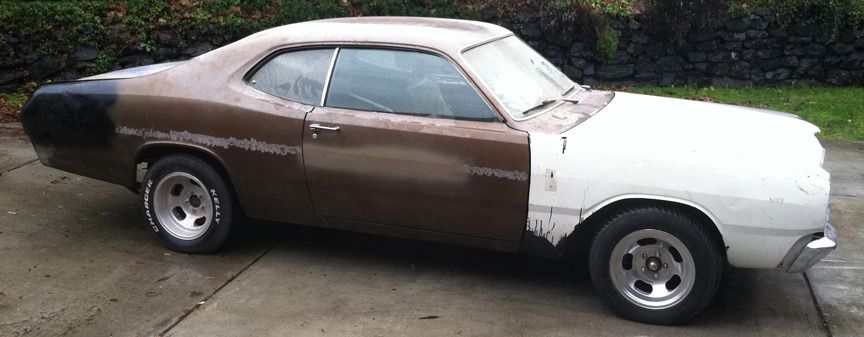 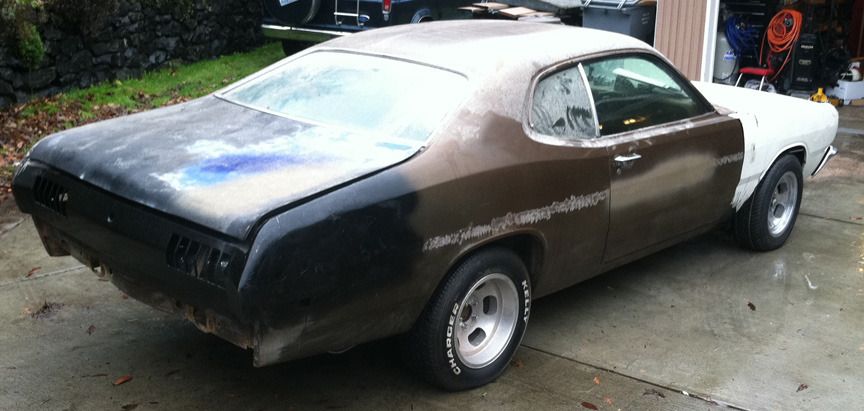 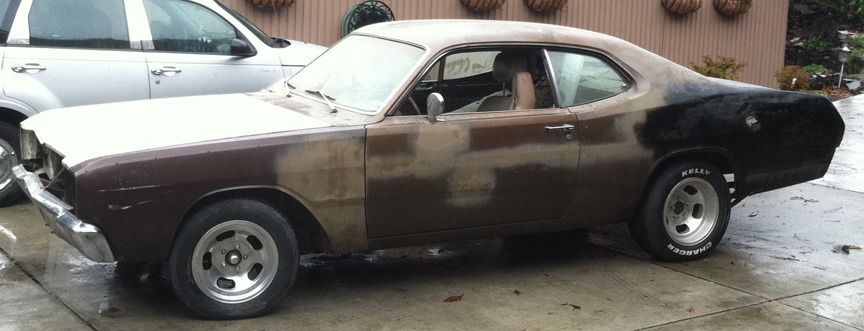 Quite a difference from when we first hauled it over to my place!  I already know that I am going to have to get creative mounting the 72 Dart rear bumper and the 67 Dart grille since the mounting holes don't line up. Also, the front fenders have dome rust and dent issues and need some attention. Still, a little extra effort is worth it. |
|
| Author: | exoJjL [ Thu Dec 29, 2011 12:23 am ] |
| Post subject: | |
Wow! Very interesting with that '67 front clip. The slotted rims look good to! It might look cool with a hood scoop like the '68 Hemi Darts had. |
|
| Author: | Dart270 [ Thu Dec 29, 2011 8:35 am ] |
| Post subject: | |
I like it!! Sorta like Doc's Dacuda. It's a Dartster... Lou |
|
| Author: | Reed [ Thu Dec 29, 2011 9:29 am ] |
| Post subject: | |
Thanks. The rims are actually used Craigslist and eBay finds. The front rims have a issue where the tires don't hold air. I don't know if it is the rims or the junkyard tires that are on the rims, but the tires leak air all around the bead. The front rims came from a California junkyard where they had sat outside for a long time. I used sandpaper and a Mother's Powerball to polish them up, but I didn't touch the bead surface. That might have been a mistake. I like the blend of the square 67-69 Dart nose with the Duster body. It is an interesting contrast between boxy and curved designs. The hood is a direct bolt on, there is one bolt hole on the front of the fenders where they bolt to the radiator support that is in a different location, and the grille mounts in different holes than the 74 grille. However, the 67 sheet metal is almost a bolt on modification. THe fenders match the door and body contours exactly. My fenders have some minor damage so the driver's door rubs a teeny bit, but once the dent is pounded out it will clear fine. |
|
| Author: | zorg [ Thu Dec 29, 2011 10:03 pm ] |
| Post subject: | |
Looks good Reed! Sure is good to see that car getting some daylight. It's certainly a very unique project, and it looks like you and your brother have the ability to pull it off nicely. I'm looking forward to seeing it on the road! |
|
| Author: | Reed [ Thu Dec 29, 2011 11:02 pm ] |
| Post subject: | |
We want to see it on the road soon too. We got the water pump on his PT Cruiser swapped out today, along with the timing chain, timing tensioner pulley, timing idle pulley, accessory belts, and all three motor mounts. Ugh. Give me a slant six any day! Duster is back in the garage now, hopefully to have the driveshaft, front brake pads, and final link of fuel hose installed tomorrow. Then I will put some fresh gas in it and we will try to start it for the first time in two years. During the two days the Duster sat outside, it got rained on pretty good. Now most of the dust and grime from sitting in the garage is washed off. It really makes me want to finish up the bodywork and get it looking good. The new plan for the paint and interior is Winchester grey metallic with black pinstripe accents and a black interior. |
|
| Author: | exoJjL [ Thu Dec 29, 2011 11:15 pm ] |
| Post subject: | |
I recently got some studded tires mounted on my car. The beads were torn up on one tire but not horrible. My local junkyard mounted them for me and they used some kind of sealant on the rim and tire. |
|
| Author: | Mitch67 [ Sat Dec 31, 2011 12:37 pm ] |
| Post subject: | |
Good job Reed! Can't wait to see it finished. |
|
| Author: | Reed [ Sat Dec 31, 2011 2:02 pm ] |
| Post subject: | |
IT'S ALIVE!!!! Today we put in five gallons of fresh gas, hooked up the new/used Budget Battery, and started the motor for the first time in two years. It was amazing. We cranked it for about 20 second to get the oil pressure up, then plugged the coil wire into the cap, cranked it again, and VROOM! Right up to high idle like it should. Very smooth idle too. I was very impressed. I took a video of the first start in two years but need to figure out how to edit it and post it. The driveshaft won't be done until next week, so all we can do is start the motor. We ran a modified version of Dan's engine flush soup through the motor. The oil in it was the oil that was in it when we bought the car in February of 2009, and who knows how long it had been in the motor before that. The motor also had a Fram oil filter. Yuck. As soon as the soup is done draining, the motor will be filled with 5W-30 synthetic and get a Purolator Plus oil filter. It is very fun to see this old beast coming back top life. We did discover the power steering gearbox leaks badly where the steering shaft enters the gearbox. I need to research if this is a seal that can be replaced or if it is time for a whole new gearbox. |
|
| Author: | Joshie225 [ Sat Dec 31, 2011 2:40 pm ] |
| Post subject: | |
Reed, I have a large sector steering box that I'm pretty sure doesn't leak and pitman arm puller too. I have a feeling I might be able to make it up your way before the car hits the road, but that's just a guess. |
|
| Author: | Eric W [ Sat Dec 31, 2011 6:13 pm ] |
| Post subject: | |
Thats great Reed! Wish I was there to hang out and help you. Looks like fun! |
|
| Author: | Reed [ Sun Jan 01, 2012 10:18 am ] |
| Post subject: | |
Josh- I'd be interested. It will be a while before I get to fixing the steering gearbox. I have to get all the bodywork done first. I am going to address the gearbox when I strip out the engine bay to clean it and paint it. Eric- Thanks. It is always more fun with friends around. |
|
| Page 4 of 12 | All times are UTC-07:00 |
| Powered by phpBB® Forum Software © phpBB Limited https://www.phpbb.com/ |
|