5/16
| Slant Six Forum https://www.slantsix.org/forum/ |
|
| Which Way toTDC? https://www.slantsix.org/forum/viewtopic.php?t=22856 |
Page 1 of 1 |
| Author: | 61 V200 [ Mon Apr 23, 2007 8:34 pm ] |
| Post subject: | Which Way toTDC? |
I'm wondering which method people with slants prefer to get to TDC? VW guys use a pencil with the eraser end down(careful). I read about using a dial indicator off the valves of #1. I've seen plunger type dial indicators for flatheads. A piston stop appeals to me. Which method do you prefer? All opinions welcomed and appreciated. |
|
| Author: | dakight [ Mon Apr 23, 2007 9:29 pm ] |
| Post subject: | |
A piston stop and a degree wheel is probably the most accurate method, especially with the head on. I can't see how a dial indicator on a valve would work satisfactorily because the lifter rides the base circle for most of a full turn of the crank on the compression/power stroke. I suppose you could use the valves on #6 if you know the exact valve timing but that would get really tricky I would think. A dial indicator on a piston top with the head off works but you have to be really careful because there is several degrees of dwell at the very top of the stroke where the piston moves only a tiny amount. |
|
| Author: | Pierre [ Mon Apr 23, 2007 10:20 pm ] |
| Post subject: | |
I was thinking about getting one of these but it sounds like a piston stop is better. Even with all the plugs out, Im afraid of causing piston damage with one. |
|
| Author: | dakight [ Tue Apr 24, 2007 5:19 am ] |
| Post subject: | |
As long as you are turning the engine by hand there is little danger of damage. I don't believe that indicator would work very well on a slant; the spark plug is at too steep an angle to the piston. Then, there's the problem of dwell near TDC and that gadget is even less sensitive than a dial indicator |
|
| Author: | Pierre [ Wed May 16, 2007 11:49 pm ] |
| Post subject: | |
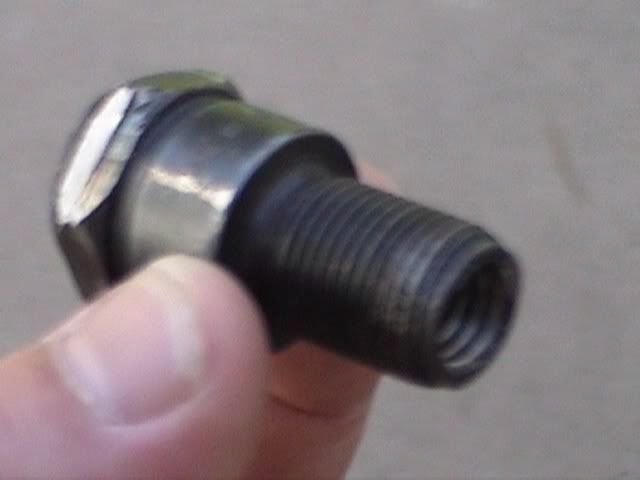
I ended up getting that indicator and also the snapon piston stop. Good call on the indicator, it bent on first use. It was only $20, meh I had to try it. Now the piston stop was a whole other nightmare. Using it was pretty straight forward. Pulled all the plugs out, threaded it in until it hit the piston, made mark, turned engine until it hit again, made mark. Then turned crank a bit so it wouldn't be pressing against piston. I decided to do the cycle again because something didn't seem right, my new TDC was 20-30deg before where the damper was marked. I screwed the stop in a few more threads, and repeated the process - better, measured TDC was the marked TDC, meaning the damper hadn't slipped (this was a DamperDudes rebuilt unit, the mark on pulley 5deg off crank keyway). Now I tried removing the TDC tool... Long story short, I had to tighten 2 nuts on each other for the part of the stop that was still sticking out, then backing out the inner one (inserting was real easy, no tools needed just fingers). Upon inspection, the stop didn't bend but the threads got damaged in 2 places. The damage appears "radial" - not something flat like a piston hit it, but like a valve hit it. Did I screw it in too far? Wrong tool for the job? It looks like this except the piston end is rounded. Its labeled as a piston lock, not tdc tool. Does it matter if you install the piston stop with #1 before tdc and rotate engine backwards, or install it after TDC and rotate engine forwards? Couldn't imagine it does. I'd just like to know what I did wrong so I can repeat this once more without any more uh-ohs. |
|
| Author: | 61 V200 [ Thu May 17, 2007 11:35 am ] |
| Post subject: | |
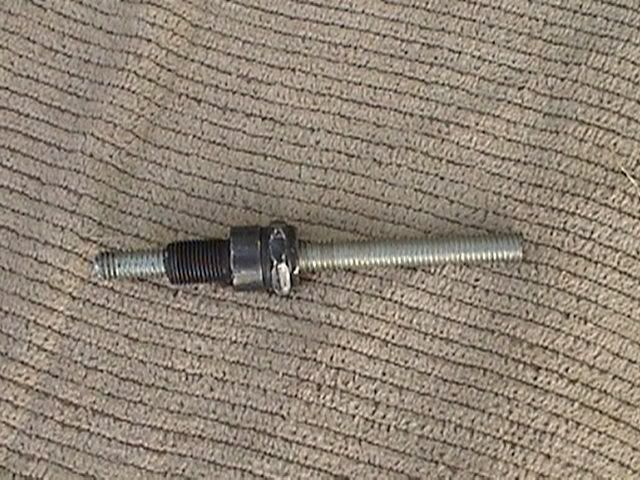
I made a stop out of an old spark plug. (Had to heat the porcelain and beat the daylights out of it to open it up.) This is how I understood the process and how I proceeded: I rotated the motor (clockwise) until I was just before TDC on #1. I used a pencil and follwed the #1 up. I also correlated that with my rotor moving towards #1. I then backed it off a bit and put the stop in place. I then rotated the crank clockwise just a small amount until it stopped, made a mark and then counter clockwise until it stopped again and then another mark Since I have no timing indicator, I marked the chain cover and corresponding locations on the balancer. My timing "by ear" and the resulting TDC mark had me at about 20* or so BTDC. No issues with mucked up threads. |
|
| Author: | dakight [ Thu May 17, 2007 3:04 pm ] |
| Post subject: | |
the only thing I can figure is that the threads extending into the chamber were clipped by a valve. I can see hoe that can happen if you thread it in too far. |
|
| Author: | Pierre [ Thu May 17, 2007 6:59 pm ] |
| Post subject: | |
Must be a really narrow margin between how far you can thread it in and how close the valve is... having oversized valves, 1.70/1.44 probably didn't help either. Thing is, when I'm looking at my spare head, it appears almost impossible to have the stop down far enough to touch the piston, but not far enough to stay away from a valve. The only way I can see doing it is using a spark plug base (or plug antifowler) and threading something like a 1/4" or smaller screw into it, so the narrower screw touches the piston and provides more clearance around the valves. 61 V200 - I imagine this is what your creation looks like. Care to post pictures? Boy I wish I had tried it on the spare head before going through it on the daily driven engine in car. Good thing the valves were stainless. No major damage evident, compression was actually higher in that cylinder compared to the rest (150-160, this one was 175, measurements taken before valve adjustment). |
|
| Author: | 61 V200 [ Fri May 18, 2007 4:33 pm ] |
| Post subject: | |
5/16
|
|
| Page 1 of 1 | All times are UTC-07:00 |
| Powered by phpBB® Forum Software © phpBB Limited https://www.phpbb.com/ |
|